Hibiscus Gift Card Holder
- Miriam Handfield

- Sep 12, 2024
- 1 min read
Updated: Nov 22, 2024

Materials:
Yarn (worsted weight or yarn size 4 ) in the following colours: yellow, light pink, medium pink, light green, dark green, black, white
Silver crochet thread
7 count plastic canvas mesh
Instructions:
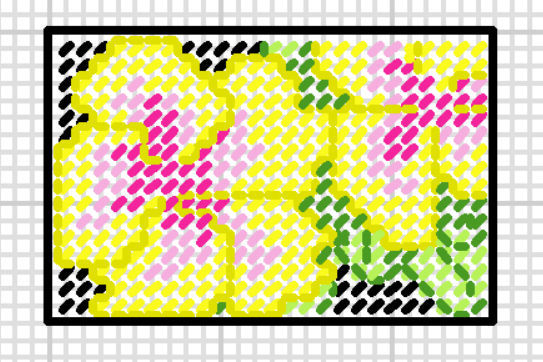
Cut out plastic canvas shapes as per diagram. The overall size of each piece is 26 holes wide by 17 holes high.

2. In corresponding yarn colours, fill in the tent stitches and straight stitches as per diagram below.

3. In white yarn (indicated by dark yellow stitch marks) and dark green yarn, add the back stitch details as shown in diagram. Stitch overtop of the white backstitches with silver metallic embroidery floss.

4. Using medium pink yarn, straight stitch the stamman. Add French knots in metallic silver crochet thread where the dots are as per diagram below.

5. Using the overcast stitch, finish the top edges of both pieces in black yarn.
6. Using black yarn, whipstitch the remaining three sides of gift card holder together making sure not to whipstitch the edges done in the overcast stitch.
Your project is now complete and should look similar to the photo of the sample piece shown.
*********
If you enjoyed this free pattern please consider supporting me by purchasing a printable instant download PDF copy.


Comments